Introduction
Imagine a slice of heaven on a plate, where the creamy richness of cream cheese meets the tropical sweetness of fresh pineapple. The Pineapple Cream Cheese Pie is not just a dessert; it’s a delightful experience that transports your taste buds to a sun-kissed beach with every bite. This pie is perfect for any occasion, whether it’s a summer barbecue, a holiday gathering, or simply a treat for yourself. Its vibrant flavors and luscious texture make it a crowd-pleaser, enticing everyone to come back for seconds.
The appeal of Pineapple Cream Cheese Pie lies in its harmonious blend of flavors. The creamy filling, made primarily of cream cheese, is lightened with whipped cream and complemented by the natural sweetness of crushed pineapple. This combination results in a dessert that is both indulgent and refreshing, making it an ideal choice for warm weather or festive celebrations. Moreover, the pie can be prepared in advance, allowing you to enjoy the festivities without the stress of last-minute baking.
To achieve the best results, it is crucial to use fresh, high-quality ingredients. Fresh pineapple, in particular, elevates the pie from ordinary to extraordinary, providing a burst of flavor that canned versions simply can’t replicate. Let’s dive deeper into the key ingredients that bring this tropical delight to life and explore how to prepare this delectable dessert.
Understanding the Ingredients
A successful Pineapple Cream Cheese Pie hinges on the quality and balance of its ingredients. Each component plays a vital role in creating the perfect flavor profile and texture. Here’s a detailed breakdown of what you’ll need:
Graham Cracker Crust
The crust of the Pineapple Cream Cheese Pie is a simple yet essential element that provides the foundation for the filling. Made from crushed graham crackers, butter, and sugar, this crust offers a delightful crunch that contrasts beautifully with the creamy filling. The buttery flavor of the crust complements the tropical notes of the pie, while its slightly sweet taste enhances the overall experience. You can easily make this crust at home or purchase a pre-made version to save time.
Cream Cheese
Cream cheese is the star of the filling, contributing a rich and creamy texture that is both indulgent and satisfying. Its neutral flavor allows it to absorb and enhance the sweetness of the other ingredients, making it the ideal base for this pie. For the best results, use full-fat cream cheese, as it will provide a creamier consistency and richer flavor compared to reduced-fat options. Soften the cream cheese before mixing to ensure a smooth filling without lumps.
Powdered Sugar
Powdered sugar is a key ingredient that sweetens the filling while also providing a smooth texture. Unlike granulated sugar, powdered sugar dissolves quickly, making it easier to mix into the cream cheese without leaving any gritty texture. The amount of powdered sugar can be adjusted based on your sweetness preference, but it’s essential to strike a balance to ensure the pie remains light and refreshing, rather than overly sweet.
Vanilla Extract
A splash of vanilla extract adds depth and warmth to the flavor profile of the pie. Its aromatic qualities enhance the overall taste, giving the creamy filling a subtle complexity. Opt for pure vanilla extract for the best flavor, as imitation vanilla can lack the richness and authenticity that pure extracts provide. A little goes a long way, so just a teaspoon will suffice.
Crushed Pineapple
Crushed pineapple is the star ingredient of this recipe, providing a juicy burst of tropical flavor. It brings sweetness and acidity to the filling, balancing the richness of the cream cheese. For the freshest taste, use canned crushed pineapple that is packed in its juice rather than syrup; this will prevent the pie from becoming overly sweet. If you prefer, you can also use freshly crushed pineapple, but make sure to drain it well to avoid excess moisture in the filling.
Whipped Cream
Whipped cream plays a crucial role in lightening the filling, making it airy and fluffy. It adds a luscious texture that enhances the overall mouthfeel of the pie. You can use store-bought whipped cream or make your own from heavy cream and a bit of sugar. For homemade whipped cream, beat the heavy cream until soft peaks form, then gently fold it into the cream cheese mixture to maintain the airy texture.
Coconut Flakes (Optional)
For those who enjoy an extra layer of flavor and texture, coconut flakes can be added to the filling or used as a garnish. Coconut complements the tropical theme of the pie and adds a delightful chewiness. If using, opt for sweetened or unsweetened coconut flakes based on your preference. Toasting the coconut flakes before adding them to the pie can enhance their flavor and provide a nuttier taste.
Garnishes
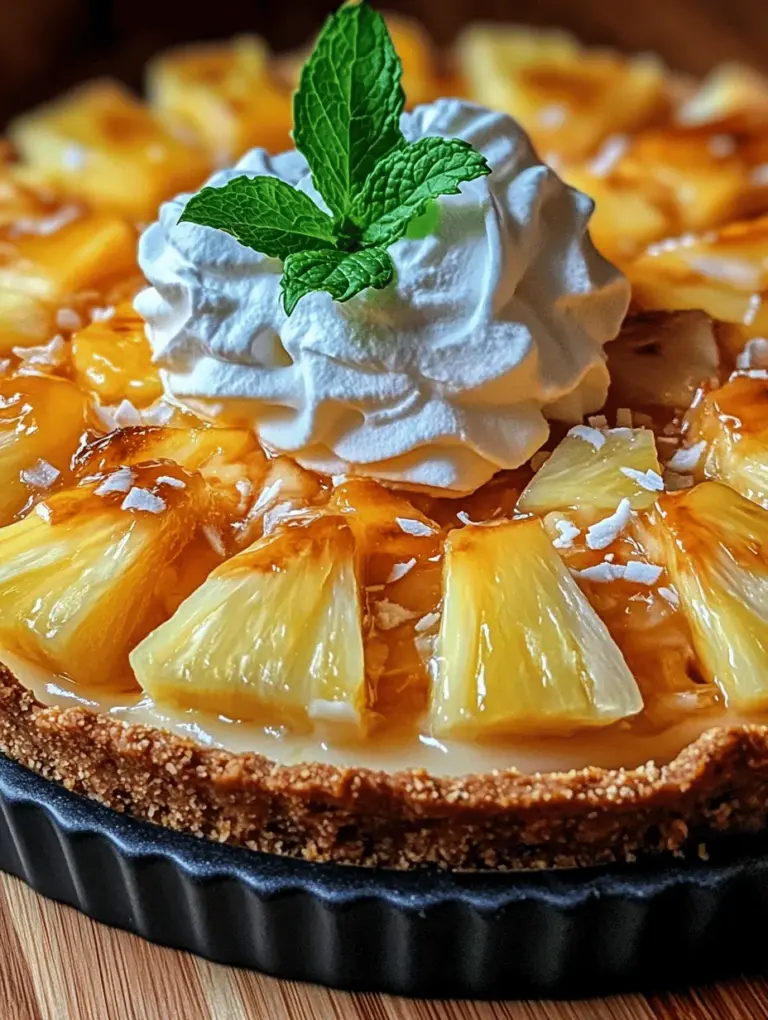
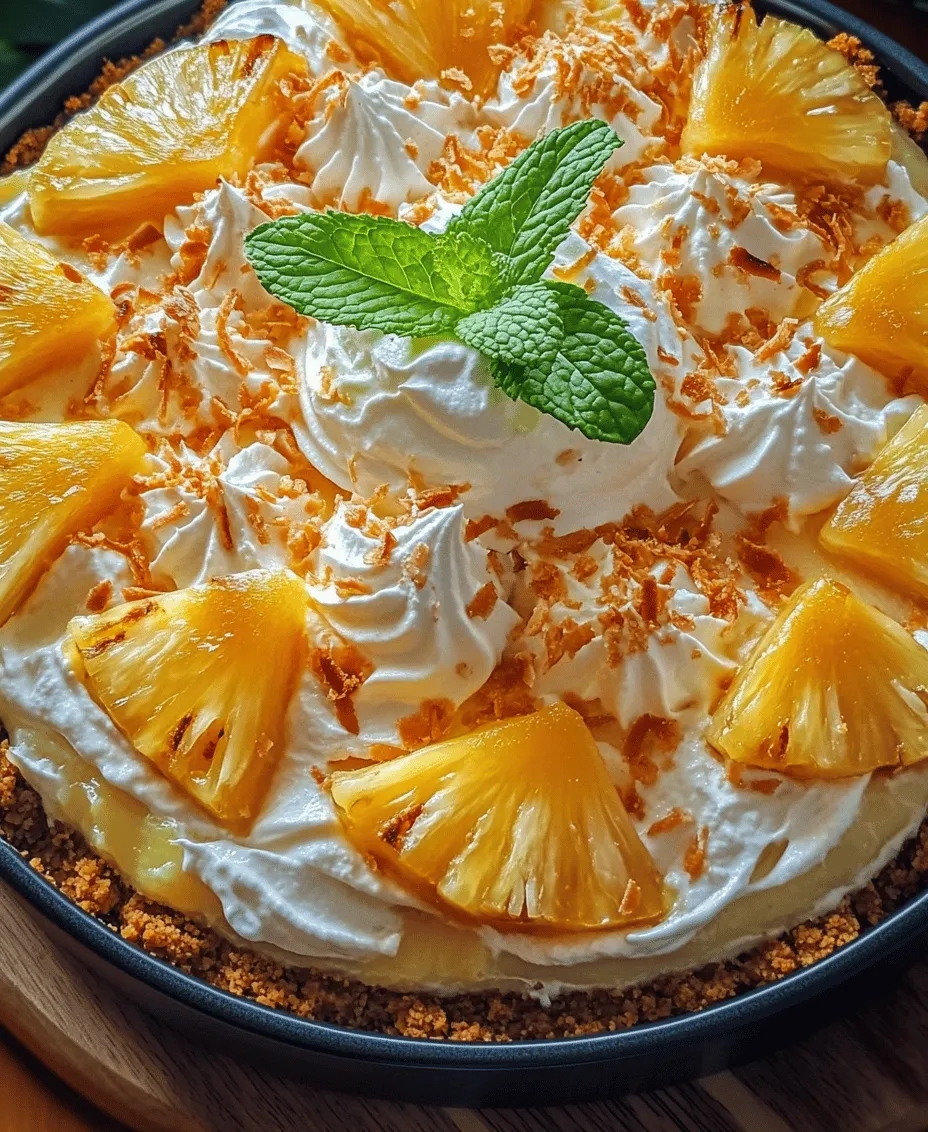
Finally, garnishes play a significant role in the presentation and flavor of the Pineapple Cream Cheese Pie. Fresh pineapple slices and mint leaves not only enhance the visual appeal but also add a burst of freshness to each slice. Consider adding a few mint leaves on top for a pop of color and a refreshing aroma that complements the tropical flavors of the pie.
Preparation of Pineapple Cream Cheese Pie
Now that we’ve explored the ingredients, let’s move on to the preparation of this delicious pie. Making Pineapple Cream Cheese Pie is a straightforward process that involves mixing the filling and assembling the pie. Follow these step-by-step instructions to create a stunning dessert that will impress your family and friends.
Mixing the Cream Cheese Filling
1. Prepare the Cream Cheese: Start by taking your cream cheese out of the refrigerator and allowing it to soften for about 30 minutes at room temperature. This step is crucial for achieving a smooth filling. If you forget to soften it, you can microwave the cream cheese in 10-second intervals until it becomes soft but not melted.
2. Combine Cream Cheese and Sugar: In a large mixing bowl, add the softened cream cheese and the powdered sugar. Using an electric mixer on medium speed, beat the mixture until it is creamy and well combined. Scrape down the sides of the bowl as needed to ensure everything is mixed evenly.
3. Add Vanilla Extract: Once the cream cheese and powdered sugar are thoroughly mixed, add the vanilla extract. Continue to beat the mixture for another minute until the vanilla is fully incorporated.
4. Incorporate Crushed Pineapple: Next, fold in the crushed pineapple, ensuring it is well distributed throughout the mixture. If using canned pineapple, be sure to drain it properly before adding it to prevent the filling from becoming too watery.
5. Fold in Whipped Cream: In a separate bowl, whip the heavy cream until soft peaks form. Gently fold the whipped cream into the cream cheese and pineapple mixture using a spatula. This step is important to maintain the light and airy texture of the filling, so be careful not to overmix.
6. Pour into the Crust: Once the filling is fully combined and fluffy, pour it into the pre-prepared graham cracker crust. Spread it evenly with a spatula, smoothing the top for an attractive presentation.
By following these initial steps, you’ll set the foundation for a Pineapple Cream Cheese Pie that is not only visually appealing but also bursting with tropical flavors. The next phase will involve chilling the pie to allow the flavors to meld and the filling to set, creating the perfect dessert for any occasion.
Incorporating the Pineapple
When it comes to folding in pineapple into your cream cheese mixture, gentle techniques are key to maintaining the fluffiness of your filling. Start by using crushed pineapple for a smoother texture, or opt for small chunks if you prefer more fruitiness in each bite.
1. Drain Properly: If using canned pineapple, ensure that you drain it well to remove excess juice, which can make your filling runny. If fresh, chop it finely and pat it dry with paper towels.
2. Folding Technique: Use a rubber spatula to gently fold the pineapple into the cream cheese mixture. Start by adding a small amount of the pineapple to the mixture and stirring it in lightly. Continue adding the pineapple gradually, folding it in carefully to prevent deflating the whipped cream. The goal is to keep the mixture airy, so avoid vigorous stirring.
3. Texture Balance: The pineapple should be evenly distributed throughout the filling without overwhelming the creamy texture. This balance will ensure each slice of the pie has a delightful burst of pineapple flavor.
Adding Whipped Cream
Incorporating whipped cream is what elevates your Pineapple Cream Cheese Pie to a whole new level of indulgence. Here’s how to ensure your whipped cream remains light and fluffy:
1. Chill Everything: Before whipping the cream, chill your mixing bowl and beaters in the refrigerator for at least 15 minutes. This helps the cream whip more effectively.
2. Whipping Technique: Use heavy cream for the best results. Start whipping at a low speed and gradually increase to medium-high. Stop when stiff peaks form, which means the cream holds its shape without drooping.
3. Incorporation: Once your whipped cream is ready, take a small portion and mix it into the cream cheese mixture to lighten it up. Then, gently fold the remaining whipped cream into the mixture. This two-step process enhances the fluffiness and ensures a smooth blend without losing airiness.
Filling the Crust
Now that your filling is complete, it’s time to fill the crust. Here are some techniques to achieve an even distribution and a smooth top:
1. Spoon Carefully: Using a large spoon or spatula, dollop the filling into the prepared pie crust. Start from the center and work your way to the edges to avoid overfilling in one spot.
2. Leveling Off: Use the back of a spatula or a flat edge to gently spread the filling outwards. This creates a nice, level surface and helps to eliminate air pockets.
3. Smooth Finish: For a professional look, run a spatula across the top of the filling in a sweeping motion, smoothing it out and ensuring it’s even. This step is important not only for aesthetics but also for ensuring that each slice has an equal distribution of filling.
Chilling Process
The chilling process is crucial in achieving the perfect Pineapple Cream Cheese Pie. Here’s why refrigeration is essential:
1. Flavor Enhancement: Allowing the pie to chill for at least four hours, or preferably overnight, helps the flavors meld together. The cream cheese filling will firm up, creating a luscious texture that contrasts beautifully with the crust.
2. Setting the Filling: Chilling enables the filling to set properly, making it easier to slice when serving. If served too soon, the filling might be too soft and could spill out, ruining the presentation.
3. Optimal Serving Temperature: A well-chilled pie is refreshing and makes for a delightful dessert, especially during warmer months. The coolness complements the tropical pineapple flavor, making each bite a treat.
Serving Suggestions
When it comes to serving your Pineapple Cream Cheese Pie, presentation is key. Here are some ideas to make your dessert visually appealing and enjoyable:
Serving Temperature
– Best Practices: Serve the pie cold straight from the refrigerator for maximum refreshment. If the pie has been in the fridge for a while, let it sit at room temperature for about 15 minutes before slicing to make cutting easier.
Garnishing Options
– Fruits and Herbs: Top the pie with additional fresh pineapple chunks or slices for a burst of color. Consider adding a sprinkle of shredded coconut or a few mint leaves to enhance the tropical vibe. You can also drizzle a light glaze made from melted white chocolate for an elegant touch.
– Whipped Cream: Add dollops of freshly whipped cream on top of each slice for a creamy finish. Consider using a piping bag for more decorative presentation.
Pairing Ideas
– Beverage Suggestions: Pair your pie with a refreshing beverage. Tropical juices, like mango or passionfruit, complement the flavors beautifully. For a cocktail option, try a light rum punch or a piña colada for a cohesive tropical experience. If you prefer non-alcoholic choices, a coconut-infused iced tea can be a perfect match.
Nutritional Information
Understanding the nutritional content of your Pineapple Cream Cheese Pie can help you enjoy it in moderation:
– Overview: Each slice (approximately 1/8 of a pie) contains around 250-300 calories, depending on the crust and other ingredients used. The pie is rich in fats from cream cheese and whipped cream but also provides some vitamins from the pineapple.
– Dietary Considerations: For those with dietary restrictions, consider using a gluten-free crust to accommodate gluten sensitivities. If you are looking to reduce sugar, try substituting with a natural sweetener, like stevia or erythritol, while ensuring the consistency remains intact.
Storage and Shelf Life
Proper storage is essential for keeping your Pineapple Cream Cheese Pie fresh:
1. Storing Leftovers: Cover the pie with plastic wrap or place it in an airtight container to prevent it from absorbing odors from the fridge. If using a pie dish, you may also use a pie keeper for additional protection.
2. Shelf Life: The pie is best enjoyed within 3 to 4 days when stored in the refrigerator. While it may still be safe to eat after this period, the texture and flavor may start to diminish. Always check for signs of spoilage, such as off smells or discoloration, before consuming.
Conclusion
In summary, the Pineapple Cream Cheese Pie is a delightful dessert that combines tropical flavors with creamy indulgence. By following the steps outlined—incorporating pineapple carefully, adding whipped cream to maintain fluffiness, filling the crust evenly, and allowing for a proper chilling process—you can create a stunning pie that’s sure to impress.
Its versatility makes it perfect for various occasions, be it a summer gathering, a festive celebration, or simply a treat to enjoy at home. With the presentation tips and pairing suggestions provided, your Pineapple Cream Cheese Pie will not only be a treat for the taste buds but also a feast for the eyes.
So gather your ingredients and give this recipe a try. Enjoy a taste of the tropics right in your kitchen!